

How to Import EML to Outlook - Complete Guide
Jack Sam
- Oct 10, 2025
- 459
- 3
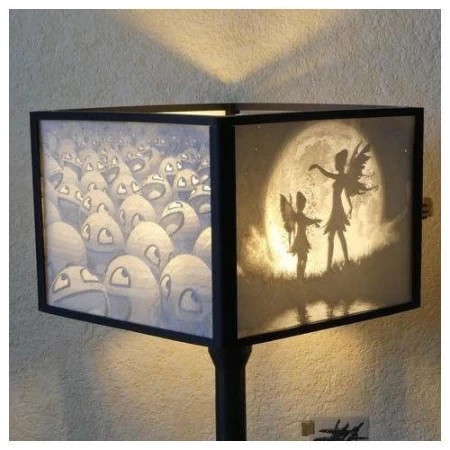
3D printing is undoubtedly one of the most disruptive technologies that have ever been devised in the history of human ingenuity and innovation. We are well aware of the immense potential of 3D printing technology to create prototypes for industrial manufacturing as well as functional objects. However, there has been a recent trend towards creating something much more long-lasting, i.e.memories in the form of 3D printed photo frame made with a lithophane.
Understanding Lithophane
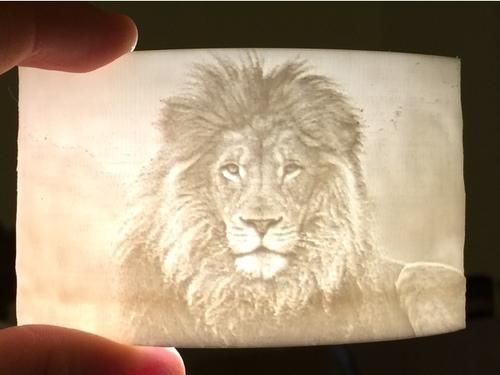
Traditionally, a lithophane denotes an etched or moulded work of art, usually done in very thin translucent porcelain which is only visible when illuminated with a backlight. The images produced by way of 3D printing with a lithophane change characteristics according to the source of the backlight. This is the distinguishing feature of these three-dimensional images.
Popular in History
The earliest recorded history of lithophane dates back to the 1800s. Back then, they were carved out of wax, moulded in plaster, cast and fired in porcelain. They took a backseat with the invention of photography. However, with the of 3D printing services, it is now possible to experience both!
The fine detailing and delicate nature of lithophanes can be best obtained on high-resolution stereolithography (SLA) 3D printer. FDM 3D printers might not be able to produce the superior quality of images obtained via SLA technology.
How It Works
There may be multiple tools for creating a lithophane photo frame, but almost all the same way. The first step involves the identification of the primary subject of the photo. Once this is done, the subject is embossed. The next step is the border of the frame. The final file is provided in a 3D format (for example, .STL)
What You’ll Need:
The Steps Explained
Final Words of Advice
3D printed lithophanes are best obtained using white filament. However, one can use other colours as well, albeit they may not yield the best results. White filament works best due to its transparency and appears more vibrant and brighter when lit up with a backlight. With other colours, the contrast won’t be the same resulting in dull images.
Online 3D printing in India is waking up to the phenomenon of 3D printed lithophane. Remember, SLA 3D printers yield the best results when it comes to printing high resolution and extremely precise and detailed lithophanes in 3D.
Once you have your 3D printed lithophane, you can choose to place it on a window which has plenty of natural light. Or, you can simply place an LED backlight to create a lithophane lamp. 3D printed lithophanes are a great option in personalized gifts or even for home décor. Look for 3D printing in Pune that can bring you the best in this regard!


